24/7 Local Restoration

Tips to installing an exhaust vent

Ventilator filters

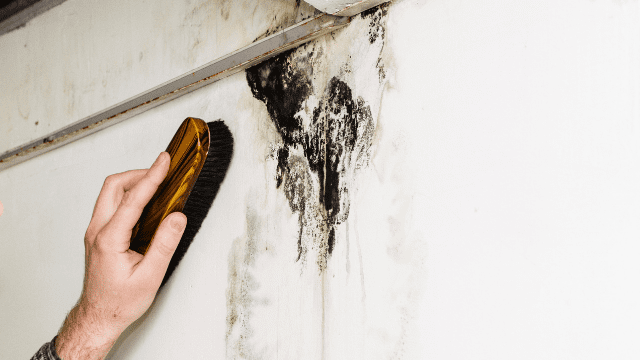
The purpose of an exhaust vent is to improve air quality inside a home by venting excess moisture that might accumulate in living spaces such as bathrooms and kitchens. Beyond removing moisture and potentially smoke from the air in the case of a stove vent, an exhaust vent also helps prevent mold from growing in these same spaces as the result of moisture build up.

It’s surprising the number of do-it-yourself homes that exist where a kitchen renovation resulted in a stove vent not venting outdoors, or a new bathroom with a shower stall and no venting. If your home doesn’t seem to have the exhaust vents it should, or if you’re adding a bathroom or completing a renovation that may call for the addition of a new vent, here are some simple tips to help you along the way. The tips here are fairly general, assuming some knowledge, and providing merely general reminders. Some jobs, particularly those that are difficult to reverse if something goes wrong, are best left to experience after all and, depending on your knowledge and skillset, this may just be one of them.


Venting to the outside

The whole point to an exhaust vent is that the moisture or smoke you are trying to get rid of must vent to the outdoors, or you’re only redirecting the problem from one space to another. People for instance, who think they can vent to an attic to avoid venting through a wall are simply forcing the excess moisture into that space where, yes, it will cause problems.

Gaining access to the outside can be done through a side wall, through the roof, or through the soffit (the underside of the roof for instance), depending in part on access and location, and in some cases perhaps, to aesthetics.


Mark the location

Let’s assume you’re going to install a bathroom vent and that you can do so easily because there is an attic space above. First, from below, you’re going to mark the location you want to install the fan by standing in the bathroom and drilling a hole in the ceiling, right through to the attic space. Then, when you’re in the attic, you can locate the hole and know exactly where you want to position the vent. Understand that you may need to adjust the location slightly if there are pipes or other structures in the way once you get into the attic to view the space and the likely position. You also want to try to position the vent roughly center between joists so be prepared to have the vent shift slightly one way or the other from where you had imagined it would be.


Measure twice

Before you cut the hole, measure the inside dimensions of the intake port so you know how big a hole to cut. And don’t forget the old saying, measure twice, cut once. The work you’ll go through if you accidentally cut the hole too big, or worse, crooked, is worth the time spent measuring and remeasuring. Speaking of crooked, a framing or layout square can ensure that the hole you cut is exactly that. It doesn’t matter how many holes you have cut in the past, or how accurate you think you eye is, there is always the chance you may be a little off and with something like this, even slightly off doesn’t work.

Safety first

Before you cut, be sure that you are equipped with the proper safety gear. Remember that cutting drywall and into a dusty attic space can release all kinds of things into the air, so goggles and a mask are essential. Make sure anyone who may be assisting, holding a ladder or just looking over your shoulder to see what you’re doing, is also equipped, just in case.


Installing the fan

Get the fan ready for installation following the manufacturer’s instructions, including attaching the duct elbow and the cable connector. Fans should be equipped with extendable brackets that will allow you to adjust and to connect properly with the joists. You’re going to want to use foil duct tape, rather than fabric duct tape on all of the connections requiring taping, because it will better stand the test of time.

Venting

Now comes the important part – venting to the outside. From inside the attic find a spot within 6 ft. of the fan and between two wall studs where the duct can exit. You’re going to want to take multiple measurements for reference so you can locate this spot next from the outside. Again, measure, measure before you actually cut through the spot on the outside.

Cut the hole in the siding or soffit, again making sure safety – goggles and ladder safety – are a priority.


Ventilation Grille, Extractor Fan

Connecting the pieces

Once you’ve cut the exterior hole and installed the wall cap, you can move back inside to attach the exhaust duct. Don’t forget to add a foam-rubber gasket to fill any gaps and help secure the duct on the outside and to make sure you aren’t creating a space that new moisture can enter. Then add some silicone adhesive to ensure it all stays in place.

Wiring

The next step involves wiring the fan so it actually works. If the key words white to white, black to black, green grounding screw, and electrical receptacle make you pause for even a second, you may want to call in professional help at this point. Not intending to be overly vague, wiring is another area you really want to be sure you have expertise, before you start so let’s just leave your tip at that.

Finishing

The final steps involve raising the blower motor and plugging it into the receptacle inside the housing you’ve installed, securing the motor with screws, and adding the finishing piece – the grill – and then testing to be sure everything works.

Professional help

As mentioned earlier, these steps and tips have been deliberately vague, in part because there are some things that require a bit of knowledge and experience to handle safely. If you know some of what you’re doing, what we’ve shared will explain itself.

If these tips did not completely make sense, it is probably worth bringing in a little professional assistance. While we love helping people make their homes better and healthier, the extra cost homeowners face when we have to not only install but fix a do-it-yourself project gone wrong, is a tough one. If you have a venting project to be done and you aren’t completely sure how to handle all of the aspects – from locating and cutting to wiring – call us to help before you try it yourself.


admin
How to Remove Black Mold
By Hugo H. 14 Nov, 2023
Black mold is one of the most commonly known strains of mold. There are well over 100,000 strains of mold, with more continuously being found. Not all mold strains were created equally, and some strains pose more potential harm than others. Knowing how to remove black mold can save you a lot of problems and help prevent your home from being overrun by this strain...24/7 Local Restoration.
Recognizing a Fire Hazard
By Mathias L. 13 Nov, 2023
Recognizing a Fire Hazard...24/7 Local Restoration.
Handling Fire Damage Restoration
By Malik G. 12 Nov, 2023
Fire damage restoration can be a tricky task to accomplish after a fire-damaging event. These services can be utilized in numerous situations. From smoke damage cleaning to major reconstruction, we can handle it all..24/7 Local Restoration.
Share by: